![]() Enhanced – check your inbox: for activities in The Monthly Toolkit
Enhanced – check your inbox: for activities in The Monthly Toolkit
All About the Camera
ameras allow us to capture and preserve moments in time. We used a camera throughout our homeschooling to fill our science and history notebooks with photos of projects and activities—including a table-sized paper mâché salt dough map and a 2017 solar eclipse party. So many sweet memories we still revisit.
While our phone cameras allow us to capture that wonderful moment of the kids cuddled on the couch listening to a read-aloud or huddled over their first dissection, “old-fashioned” cameras and photography make a fun science and history study.

The basic principles of the pinhole camera can be traced back to ancient China and Greece. Chinese philosopher Mozi (circa 470-391 BC) documented the phenomenon of light passing through a small hole and creating an inverted image on the opposite wall of a dark room. Aristotle (384-322 BC) also described the concept of a dark room with a small hole, which he used to explain how the sun’s rays formed an image during a solar eclipse.
During the ninth to thirteenth centuries, scholars extensively studied the properties of light and described how an image could be formed on the opposite wall of a dark room through a small aperture. This work laid the foundation for our understanding of the pinhole camera.
The concept of the pinhole camera gained traction in Europe during the Renaissance. Leonardo da Vinci wrote about the camera obscura in his notebooks, and it was used as a drawing aid by artists to project scenes onto a canvas for tracing and reference.
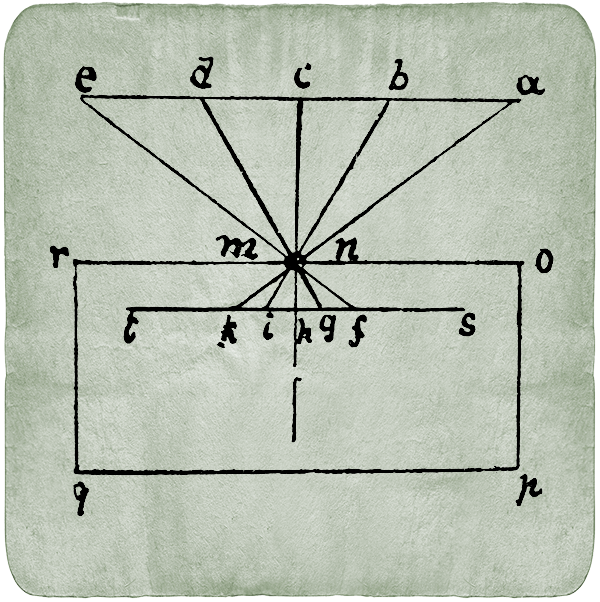
Imagine the objects A, B, C, D, and E are illuminated by sunlight, and let O and R represent the front of the dark chamber with a hole at N and M. Place a sheet of paper at S and T to intercept the rays of the images of these objects. The images appear upside down due to the straight path of the rays, causing A on the right to appear as K on the left, and E on the left to appear as F on the right.
The camera obscura was used in the arts and sciences. The camera obscura helped artists accurately capture scenes, perspectives, and proportions. They could trace the image projected onto the interior surface. The camera obscura was crucial in advancing the understanding of optics and the nature of light. It provided insights into how light travels in straight lines and can form images.
Fast forward to the 1820s, French inventor Joseph Nicephore Niepce created the first permanent photograph using a pinhole camera. His image, known as View from the Window at Le Gras, was exposed onto a pewter plate coated with bitumen of Judea and required an extremely long exposure time.
Niepce’s work paved the way for the development of modern photography. His collaborator, Louis Daguerre, further improved the process, leading to the invention of the daguerreotype in 1839. The daguerreotype was an early photographic process that marked the beginning of popular photography.
In 1888, George Eastman introduced the Kodak camera, making photography more accessible to the public. These cameras came preloaded with a flexible roll film. After taking pictures, the entire camera was sent to Kodak for film development.
In the 1920s, the 35mm film format, used in cameras like the Leica, made photography more portable and convenient. These cameras were smaller and easier to carry, allowing people to take pictures on the go.
In the 1940s, the single-lens reflex (SLR) cameras were developed. SLR cameras have a mirror and a pentaprism which allow photographers to see directly through the lens. This improved focusing and framing accuracy.
In 1947, instant photography was made available when Edwin Land introduced the Polaroid camera. Users could see their pictures right after taking them.
In the late twentieth century, there was a major shift in photography when digital cameras used sensors to capture images and store them as electronic files. This eliminated the need for film and allowed for instant review and sharing of photos.
The integration of cameras into smartphones changed how we take and share pictures. With the convenience of a built-in camera, everyone can be a photographer!
Mirrorless cameras were introduced and have advanced in the 2000s. Mirrorless cameras offer DSLR-like quality in a smaller and lighter form.
Drones equipped with cameras have made aerial photography and videography more accessible. Action cameras like GoPro have revolutionized capturing extreme sports and adventures.
Augmented reality and artificial intelligence are emerging camera technologies that offer features like real-time language translation and enhanced image recognition.
Aperture: The camera’s aperture is like the eye’s pupil. It controls the amount of light that enters the camera. A wider aperture allows more light in, while a narrower one restricts the light.
Shutter Mechanism: The camera’s shutter acts as a gate, controlling the exposure time. It opens and closes to regulate how long light can hit the image sensor. Fast shutter speeds freeze fast-moving subjects, while slow shutter speeds capture motion and allow more light in.
Lens: The lens focuses incoming light onto the camera’s image sensor. Different lenses offer various focal lengths, allowing you to capture wide-angle or zoomed-in shots.
Image Sensor: The image sensor is like the camera’s retina. It contains millions of tiny light-sensitive pixels that convert incoming light into electrical signals. These signals represent the image and form the basis for a digital photo.
Focusing: The camera’s focusing mechanism makes the image sharp and clear. Autofocus sensors detect the subject and adjust the focus automatically, while manual focus requires the photographer to adjust.
Analog-to-Digital Conversion: When you take a photo, the camera “sees” all the colors and brightness of the scene in front of you. The camera uses something called “analog” to show you the image. Analog is like a smooth and continuous flow of information. It’s similar to how you can change the volume on your radio smoothly, without any jumps. In a camera, analog information is what you see through the camera lens. Imagine you want to share your photo with friends on your computer or smartphone. To do that, the camera needs to turn the analog picture into something your computer can understand, which is called “digital.”
Image Processing: Most cameras apply image processing to the captured data, adjusting color balance, contrast, and sharpness, as well as applying effects or settings chosen by the photographer.
Storing Images: The image is stored on a memory card or internal memory within the camera.
Displaying and Reviewing Images: Cameras often have an LCD screen on the back for previewing and reviewing images.

The Camera Heritage Museum has a gallery of interesting cameras, helpful for a research project!
Free photo lessons for kids from Photoworkout.com


ichelle Moody, is a veteran homeschooling mom and owner of Thehomeschoolscientist.com. After earning a masters degree in child development and education, God’s plan took her into a 12 year biotechnology career. She came home to homeschool. Now, she has returned to her first love of helping children explore and discover the world God has gifted us. Besides homeschooling her own children, Michelle has taught in the traditional classroom, in co-ops, and on the mission field in Bangladesh.